


Pack Leak Free in 20 Minutes: Decant Toiletries for Carry On Travel
To fly carry-on only, decant liquids into containers labeled 3.4 oz (100 ml) or smaller, matched to the product they hold, filled to about 80 to 90 percent capacity, and pack them in one quart-size clear bag. Test every bottle for leaks before it goes anywhere near your suitcase, and keep the bag easy to pull for screening. Get those five things right and the rest of your carry-on packing gets a lot easier.
TL;DR:
- Decant toiletries into labeled containers that comply with the 3.4 oz (100 ml) limit, filling them to 80-90 percent capacity to prevent leaks.
- Keep prescription medications in their original pharmacy-labeled containers, as decanting can complicate clearance at security checkpoints.
- Use durable, gasketed, wide-mouth bottles made from materials like HDPE or amber glass, tailored to each product’s sensitivity and composition.
- Test each decanted bottle for leaks by flipping and squeezing over a sink before packing, ensuring a secure seal and avoiding cabin pressure leaks.
- Pack all liquids in one clear quart bag, organized by product type, with heavier items on the bottom, and keep it accessible for quick removal during security screening.
Table of Contents
- What Is the TSA 3-1-1 Rule for Decanting Toiletries Travel?
- Which Toiletries Should You Decant vs. Leave Original?
- Which Containers Work Best for Each Toiletry Type?
- How Do You Set Up a Decanting System Before a Trip?
- Why Do Decanted Bottles Leak, and How Do You Fix It?
- How Should You Label and Pack Your Quart Bag for TSA?
- What Solid Alternatives Reduce Your Liquid Load?
- How Do Compression Packing and Toiletry Bags Support Decanting?
- How Do You Clean Containers Before Decanting?
- How Do You Label Containers So Nothing Gets Confused?
- How Should You Handle Medications and Special Care Items?
- Do International Flights Follow the Same Liquids Rules?
- A Frequent Traveler’s Take on Decanting
- Where a Toiletry Bag and Compression Packing Fit In
- Sources
- FAQ
What Is the TSA 3-1-1 Rule for Decanting Toiletries Travel?
The TSA 3-1-1 rule is the backbone of every decanting decision you’ll make. Each liquid, gel, or aerosol container has to hold 3.4 ounces (100 milliliters) or less, and every container you’re carrying has to fit into a single quart-size clear bag, one bag per traveler, according to the TSA’s own liquids guidance. That’s the whole rule. No exceptions for “it’s only half full” or “I measured it and it’s really only 2.8 oz.”
Here’s the detail that trips people up: TSA officers check the container’s labeled capacity, not how much liquid is actually inside. A 6 oz bottle that’s two-thirds empty still reads as a 6 oz container and still gets pulled at the checkpoint. That’s why decanting into properly sized bottles matters more than eyeballing how much product is left in a full-size one. If the bottle says 4 oz on the bottom, it doesn’t matter that you only put 2 oz of shampoo in it.
A quick checklist before you fill anything:
- Check the molded or printed capacity on the bottle itself, not just what the seller’s listing says.
- Round down when in doubt. A “3.5 oz” bottle from an off-brand seller is a gamble you don’t need to take.
- One quart bag per person, even if you’re traveling as a couple sharing a suitcase.
- Bring the empty bag out, don’t tuck it inside a packing cube where an officer has to dig for it.
International flights layer on their own quirks, which we’ll get into later, but the 3-1-1 baseline holds for domestic US travel every time. The TSA’s FAQ page also covers what happens when an officer wants to open a container for a manual check, which happens more often with opaque or unusually shaped bottles than clear ones.
Which Toiletries Should You Decant vs. Leave Original?
Not everything belongs in a travel bottle, and figuring out which products to leave alone saves you both effort and product integrity. The goal isn’t to decant everything you own into tiny containers. It’s to shrink your liquids footprint down to what a single quart bag can hold without you white-knuckling the zipper.
Products that decant well:
- Shampoo, conditioner, and body wash — stable formulas that tolerate any container material.
- Lotion and body cream — thick enough that leak risk is low even in a squeeze bottle.
- Basic cleanser and toner — assuming the formula isn’t a light-sensitive active blend.
- Mouthwash — one of the easiest wins since travel-size versions rarely exist on shelves.
- Conditioner-in-shampoo hybrids and 2-in-1 formulas — good candidates precisely because there’s only one bottle to manage instead of two.
Products to leave in original packaging or decant only in tiny amounts:
- Prescription liquids are generally allowed above 3.4 oz with declaration, so decanting them into unlabeled travel bottles can actually create more hassle at screening, not less. Keep them in original, pharmacy-labeled containers.
- Airless pump actives like serums with retinoids or certain Vitamin C formulations can degrade once moved into generic clear plastic. A tiny decant made immediately before the trip, into an opaque or amber container, is safer than filling a bottle week in advance.
- Anything with a pressurized aerosol delivery, like some sunscreen sprays, doesn’t decant at all. It has to travel in its original can under the 3.4 oz limit or get left behind.
The trade-off that trips up a lot of travelers: sometimes a solid alternative beats decanting entirely. A shampoo bar removes an entire bottle from your quart bag, and a solid sunscreen stick sidesteps the whole “which container handles UV filters” question. We’ll cover solid swaps in more detail further down, but keep the option in mind as you sort your products into piles.
Which Containers Work Best for Each Toiletry Type?
Picking the right container isn’t just about size. It’s about matching the material to what’s going inside it, because the wrong pairing causes leaks, degraded product, or wasted money on bottles you’ll throw out after one trip.
Silicone works well for thick, forgiving formulas: shampoo, conditioner, body wash, lotion. Silicone bottles squeeze easily, which is convenient, but that same softness is a liability with certain actives. Packaging research has found that some chemical UV filters can migrate into softer plastics over time, which is why HDPE is the recommended material for chemical sunscreens rather than silicone or other soft plastics. If your sunscreen uses avobenzone, octinoxate, or a similar chemical filter, put it in a rigid HDPE bottle, not a squeezable silicone one.
HDPE (high-density polyethylene) is the workhorse choice for anything with active ingredients: sunscreens, acne treatments, exfoliating acids. It’s rigid enough to resist absorption and tough enough to survive rough handling in a packed bag.
Amber glass or opaque containers matter for light-sensitive serums, particularly retinoids and certain antioxidant formulas. Clear plastic lets UV light degrade the actives over the course of a trip, even a short one. If a serum bottle at home is already amber or opaque, that’s a strong signal about what it needs.
Airless pumps are worth the slightly higher price for anything expensive or light-sensitive. They limit air exposure, which slows oxidation, and they dispense controlled amounts so you’re not fighting a wide-mouth jar with wet hands.
Droppers suit facial oils and concentrated serums where a few drops per use is the norm. A dropper also makes it obvious how much you’re using, which helps you gauge whether a 1 oz bottle will actually last the trip.
Contact-lens cases double as surprisingly good containers for small amounts of cream, lip balm, or single-use portions of a mask. They’re not airtight enough for anything liquid-thin, but for thick pastes they’re an underused option.
Atomizers handle perfume and light facial mists well, though cheap ones clog easily. A quality atomizer with a locking nozzle is worth the extra couple of dollars over a bargain-bin version.
A few design features to prioritize regardless of material:
- Gasketed caps with a rubber or silicone seal ring resist leaks far better than a plain screw cap.
- Wide-mouth openings make filling easier and reduce the mess that leads to residue-caused leaks later.
- Locking mechanisms on flip-top or pump caps prevent accidental depression during handling.
- Marked capacity molded into the plastic, not just printed on a sticker that can peel off.
One warning worth flagging: aluminum and opaque metal containers can trigger extra manual screening because officers can’t visually confirm liquid volume through the shell. If you’ve got a metal atomizer or tin, expect a bag check, and don’t pack it at the very bottom where it’s hard to reach.
Pro Tip: Buy two extra bottles beyond what your trip requires and keep them pre-tested in a drawer at home. When one develops a slow leak mid-trip, you’ve got a known-good replacement instead of scrambling to buy a new one at a foreign pharmacy.
How Do You Set Up a Decanting System Before a Trip?
A repeatable system beats winging it every single trip, and it takes about 20 minutes once you’ve done it twice.
- Inventory your daily-use products. Walk through your actual routine, morning and night, and list every liquid or gel you touch. Skip anything you use “sometimes” unless the trip is long enough to matter.
- Do the quantity math. Multiply your daily-use amount by the number of trip days, then add a small buffer, roughly 10 to 15 percent, for spills or an extra-long travel day. A 2-week trip needing 5 ml of moisturizer per day comes out to about 70 ml before the buffer, which fits comfortably in a 3 oz bottle.
- Match each product to its container. Pull from the material guidance above: silicone for shampoo, HDPE for sunscreen, amber or airless for serums.
- Fill with a small funnel or oral syringe. Precision here matters more than speed. Leave headspace, filling to roughly 80 to 90 percent capacity rather than topping the bottle off, since altitude and temperature swings during flight can cause liquids to expand and push against a full cap.
- Wipe the threads and cap immediately. Residue left on the bottle’s threads is one of the most common causes of a slow leak, since it prevents the cap from seating flush. A quick wipe with a paper towel before capping solves most of this before it starts.
- Test with a 30-second flip-and-squeeze. Turn the bottle upside down over a sink, squeeze it firmly, and hold for a count of 30. Any dampness at the cap seam means the bottle isn’t sealed and needs a different cap, more thread cleaning, or a swap to a different bottle entirely.
Pack tested bottles into your quart bag immediately, rather than setting them aside “for later.” Bottles that sit around post-test but pre-packing have a way of getting bumped, jostled, or accidentally opened before they ever make it into the bag.
Pro Tip: Do your quantity math the week before your trip, not the night before. Rushed decanting is when overfilling happens, and an overfilled bottle is the single most common cause of a leak you’ll discover mid-flight instead of at home.
Why Do Decanted Bottles Leak, and How Do You Fix It?
Most leaks trace back to one of five causes, and nearly all of them are preventable with the workflow above.
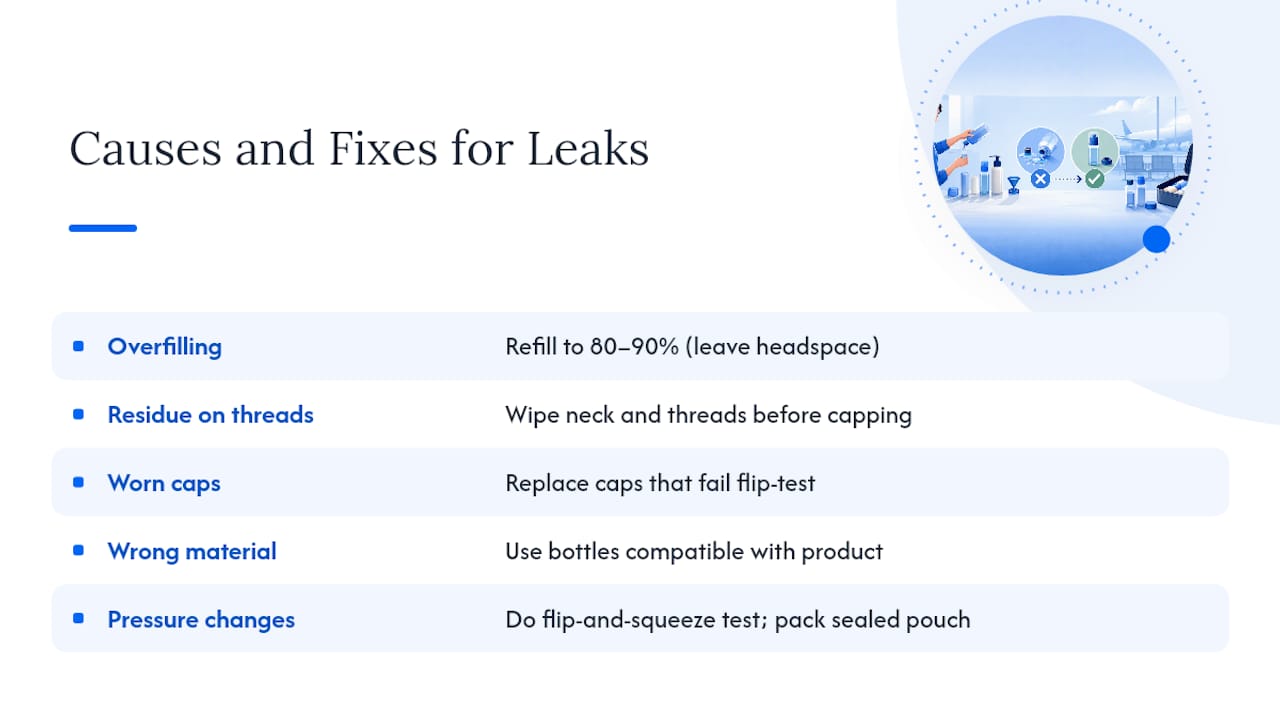
Overfilling is the top offender. A bottle filled to the brim has nowhere for expanding liquid to go except out the cap seam once cabin pressure drops. The fix is straightforward: refill to 80 to 90 percent, never more, no matter how tempting it is to squeeze in that last half ounce.
Residue on the threads prevents a clean seal even when the cap looks tightly closed. Wipe the bottle’s neck and threads with a clean cloth or paper towel before every capping, not just the first time you fill it.
A weak or worn cap is common with bottles reused trip after trip. Rubber gaskets degrade, and plastic threads strip with repeated use. If a bottle failed the flip-test even after a thorough cleaning, retire it rather than trying to nurse one more trip out of it.
Wrong material for the product shows up as leaks that seem to happen for no reason, when really it’s the product itself softening or reacting with the plastic over time. A thin oil in a bottle designed for thick lotion, for instance, finds every microscopic gap the seal has.
Pressure changes during flight will expose a marginal seal that held fine at home. This is exactly why the flip-and-squeeze test matters: it simulates the kind of pressure a cabin altitude change puts on a cap, just compressed into 30 seconds instead of spread across a flight.
Longer term, the fix isn’t better luck. It’s better bottles. Investing in gasketed, reusable containers built for repeat use costs more up front than a bag of dollar-store travel bottles, but they hold up over dozens of trips instead of one or two. Pairing quality bottles with a sealed toiletry pouch as secondary containment means a rare leak stays contained to the pouch instead of soaking through your entire carry-on.
How Should You Label and Pack Your Quart Bag for TSA?
Labeling isn’t just tidy. It’s functional. A quick label showing product name, whether it’s an AM or PM item, and the date you filled it helps you spot an expired decant before it goes bad mid-trip, and it speeds up the moment a TSA officer glances into your bag.
Simple labeling that works:
- Masking tape and a permanent marker handles most bottles fine and peels off clean afterward.
- Small adhesive labels printed or handwritten look neater for anyone who reuses the same bottles constantly.
- A written cheat sheet taped inside your toiletry bag lid, listing what’s in each unlabeled bottle, works as a backup if labels wear off.
Organize the quart bag by grouping similar-use items together: cleansing products in one cluster, hair products in another. Place heavier glass or metal containers toward the bottom of the bag so lighter plastic bottles aren’t crushed underneath them. Keep the whole bag near the top of your carry-on, not buried under clothes, so you can pull it out fast at the checkpoint without unpacking everything else.
Prescription topicals and any opaque or metal container should sit somewhere easy to access, since these are the items most likely to get a manual check. The TSA’s FAQ confirms that prescription liquids can be declared separately from the quart bag limit, but officers will typically want to inspect them, so keep the original pharmacy label intact rather than transferring the medication to an unlabeled bottle.
What Solid Alternatives Reduce Your Liquid Load?
Swapping select liquids for solids is one of the most underused tricks for shrinking a quart bag, and it sidesteps the 3-1-1 rule entirely since solids aren’t subject to it.
- Shampoo and conditioner bars replace two bottles with two compact pucks that don’t leak, ever.
- Toothpaste tablets eliminate a tube that’s constantly at risk of bursting under compression.
- Solid deodorant and solid perfume skip the container question altogether.
- Solid sunscreen sticks avoid the whole HDPE-versus-silicone debate for chemical filters.
Store solids in a small ventilated case or a mesh bag rather than sealing them airtight, since trapped moisture leads to sogginess and, eventually, mold. For longer trips, combining a handful of solids with a minimal liquids kit, just the serums and actives that genuinely need liquid form, keeps your quart bag nearly empty.
How Do Compression Packing and Toiletry Bags Support Decanting?
A well-organized toiletry bag does more than hold your decanted bottles. A design with separate compartments keeps damp items away from dry ones and stops a minor leak from spreading into your clothes, which matters more than most travelers realize until it happens once. Structured compartments also make it faster to pull your quart bag out at security instead of digging through a jumble of loose bottles.
Compression packing plays a supporting role here too, as explained in this helpful Travel Capsule Wardrobe guide that complements minimal liquids packing by freeing up carry-on space. Once your liquids kit is trimmed down to the essentials, compressing your clothing frees up enough carry-on space that a carry-on-only trip stops feeling like a math problem and starts feeling normal. That combination, minimal liquids kit plus a compressed carry-on, is what actually gets frequent travelers off the checked-bag line entirely.
How Do You Clean Containers Before Decanting?
Skipping this step is how new travel bottles end up smelling like whatever the factory packaging used, or worse, how residual bacteria from a previous use contaminates a fresh batch of product.
Wash every reusable container in hot water with a mild dish soap, working the brush or a bottle-cleaning tool into corners a quick rinse misses. Rinse thoroughly, since leftover soap residue can react with certain actives or simply dilute the product you’re about to add. Let containers air-dry completely before filling. Trapped moisture inside a capped bottle is a setup for mold, particularly in humid climates or bottles that sit packed for several days before a trip.
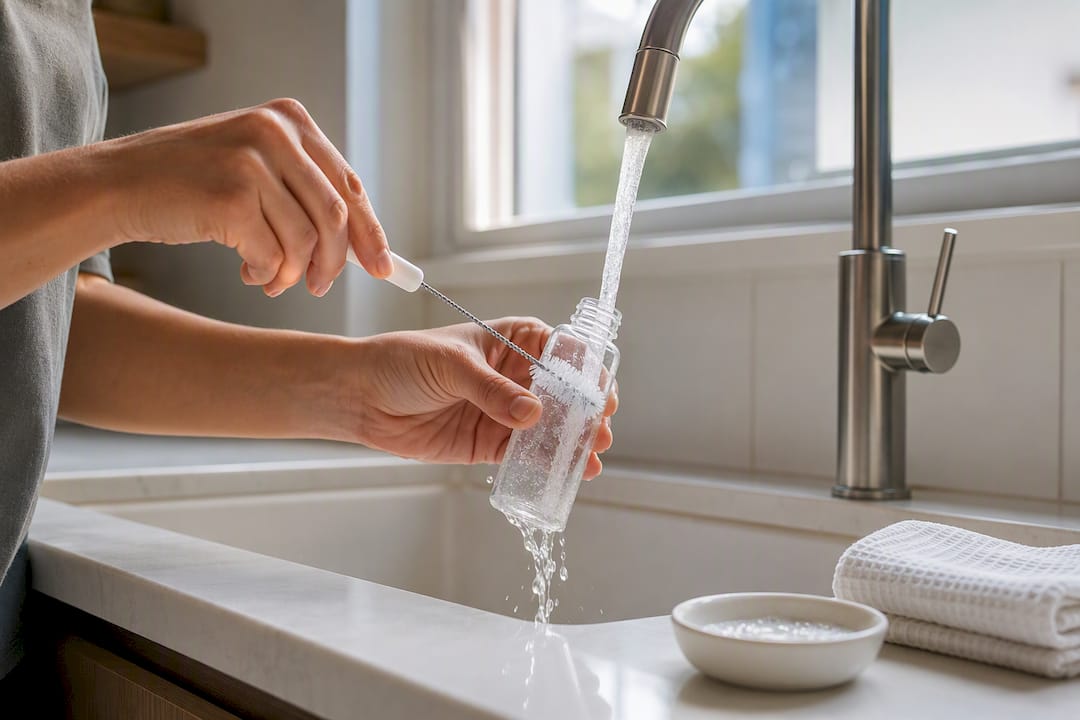
For containers that held a strongly scented product, like a previous perfume sample, a rinse with diluted rubbing alcohol followed by a water rinse clears lingering scent that would otherwise contaminate the next product you decant into it. Let that dry fully too before adding anything new.
New bottles bought specifically for travel still deserve a wash before their first use. Manufacturing residue, dust from packaging, or a factory-applied release agent can sit inside a “brand new” bottle, and you don’t want that mixing into your moisturizer on day one of a trip.
How Do You Label Containers So Nothing Gets Confused?
A label needs three pieces of information to actually do its job: the product name, whether it’s meant for morning or evening use, and the date you filled it.
The product name matters more than it sounds like it should, because three unlabeled white bottles of lotion, sunscreen, and conditioner look identical once you’re jet-lagged in a hotel bathroom. Writing “AM” or “PM” next to the name helps with routines that split by time of day, particularly for skincare with active ingredients meant for one part of the day and not the other.
The fill date is the piece most travelers skip, and it’s the one that prevents the worst outcome: using a months-old decant of a product with a short shelf life once opened, especially anything with active ingredients that oxidize over time. A bottle labeled with a fill date from three trips ago is a clear signal to toss the contents and refill fresh.
Keep the labeling system consistent trip after trip; using the same format every time (name, AM/PM, date) means you can glance at a bottle and know instantly what it is without reading closely, which speeds up both your own routine and any screening officer’s glance into your quart bag.
How Should You Handle Medications and Special Care Items?
Liquid medications get different treatment than cosmetic liquids, and decanting them isn’t the right move.
Prescription liquids are generally permitted above the 3.4 oz limit when declared to a TSA officer, according to the TSA’s FAQ, but that exception depends on the medication staying in its original, pharmacy-labeled container. Moving a prescription into an unlabeled travel bottle strips away the documentation that makes the exception work, and it can actually slow you down at screening rather than speed you up.
Keep prescription topicals, eye drops, and insulin or other medical liquids in their original packaging, separate from your general quart bag, and be ready to declare them to an officer. Special care items like baby formula, breast milk, and medically necessary liquids fall under similar exceptions and should stay in their own clearly identifiable containers rather than getting folded into your decanting system.
For over-the-counter items like allergy eye drops or a small tube of hydrocortisone, decanting into a smaller container is fine as long as it stays under 3.4 oz and gets a clear label, since these don’t carry the same declaration requirements as prescription medication.
Do International Flights Follow the Same Liquids Rules?
The core TSA rules apply to any flight departing from a US airport, domestic or international, so the 3.4 oz per container and one quart bag limit hold regardless of your destination when you’re flying out of the United States.
Where things get more complicated is on the return leg or a connecting flight through a foreign airport. Many countries follow similar liquids limits to the TSA’s, but enforcement details, bag requirements, and what counts as an acceptable clear bag can vary by country and by airport. A traveler connecting through a European hub, for instance, may find the liquids limit itself is comparable but the exact bag specifications differ slightly.
The safest approach for any international itinerary: treat the 3.4 oz per container limit as the baseline everywhere, keep your quart bag intact through every leg of the trip rather than repacking between flights, and check the specific departure airport’s rules if your itinerary includes a long layover with a security recheck. Rules that are exceptions in the US, like the prescription liquid allowance, aren’t guaranteed to carry over identically to a foreign airport’s screening process, so keeping medications in original, labeled packaging protects you across borders in a way that decanted bottles don’t.
A Frequent Traveler’s Take on Decanting
The step most people skip isn’t decanting itself. It’s testing. Anyone who has pulled a “spare” shirt out of a carry-on only to find it soaked in leaked conditioner knows the flip-and-squeeze test isn’t optional theater, it’s the difference between a smooth trip and a laundry problem in a hotel sink. The other habit worth building: doing the quantity math instead of guessing. Overpacking liquids “just in case” is how a minimal kit turns into three-quarters of a full quart bag. Test every bottle at home, before it ever touches your suitcase.
— Hugh
Where a Toiletry Bag and Compression Packing Fit In
Decanting solves the liquids problem. What it doesn’t solve is where those bottles live once they’re filled, tested, and labeled, or how you fit everything else into a single carry-on without wrestling the zipper closed. That’s where a structured toiletry bag and a compression system earn their place in your kit.
The Stoiq Toiletry Bag is built with three separate compartments, so your quart bag of decanted liquids stays isolated from dry items like your toothbrush or makeup tools, cutting down on the spill risk that comes from everything jumbled together in one pouch. Pair that with a vacuum compression bag, and the clothing you’re not wearing that day compresses down small enough that a carry-on-only trip stops requiring careful math every time you pack. The built-in USB-C rechargeable pump means you’re not hunting for a separate vacuum device or improvising with a hotel closet door, which matters when you’re trying to actually use less luggage, not more gear. If you’re ready to see what fits in a single carry-on once your liquids and clothing are both under control, start with the Stoiq Carry-On Solution and build your kit from there.
Sources
FAQ
What Are the Best Ways to Decant Toiletries for Travel?
Match each product to a container material suited to it (HDPE for sunscreen, silicone for shampoo, amber or airless for serums), fill to about 80 to 90 percent capacity, and run a flip-and-squeeze leak test before packing.
What’s the Best Way to Pack Toiletries for a Trip?
Group decanted bottles by use inside one quart-size clear bag, keep heavier containers at the bottom, and store the whole bag near the top of your carry-on for fast access during screening. A 3-compartment toiletry bag helps separate the quart bag from dry items and cuts spill risk if something leaks in transit.
What Are the Best Travel Containers for Toiletries?
Gasketed, wide-mouth containers with marked capacity work best across most products. Choose HDPE for sunscreens and active ingredients, silicone for thick everyday products like shampoo, and amber glass or airless pumps for light-sensitive serums.
Does TSA Still Require Clear Bags for Toiletries?
Yes. TSA requires all liquids, gels, and aerosols under 3.4 oz (100 ml) to fit inside one quart-size clear bag per traveler, and officers check the container’s labeled capacity during screening.
Can I Decant Prescription Medication Into a Travel Bottle?
It’s not recommended. Prescription liquids are typically allowed above the 3.4 oz limit when declared and kept in their original, pharmacy-labeled container, and moving them into an unlabeled bottle can slow down screening rather than speed it up.
