


Get Through TSA Faster, U.S. Pump Checklist and 0–100 Wh Battery Rules
Yes, TSA allows portable pumps, including breast pumps, in both carry-on and checked baggage. Breast milk, formula, and cooling packs are exempt from the 3-1-1 liquids rule, but you must declare them separately at the checkpoint. Lithium batteries follow watt-hour limits, and spare batteries always travel in the cabin, never in checked bags.
TL;DR:
- Most portable breast pumps are permitted in carry-on and checked luggage, but spare batteries must follow watt-hour limits and stay in carry-on only.
- Breast milk, formula, and cooling packs are exempt from liquids restrictions but require declaration and separate inspection at security.
- Fully frozen cooling packs reduce screening delays, while partially thawed ones may trigger extra checks due to their resemblance to other liquids.
- Lithium batteries under 100 watt-hours are allowed without approval, but higher capacities need airline approval, and over 160 Wh are generally banned.
- Declaring items early, organizing pump parts clearly, and freezing packs beforehand help smooth security screening and prevent delays.
Table of Contents
- Quick Checkpoint Checklist for Pump Travel
- TSA Rules for Portable Pumps: What’s Allowed, What’s Exempt
- Lithium Battery Rules for Pumps and Chargers
- What Happens During Screening
- Airline Policies and Keeping Milk Safe In Transit
- If TSA Questions or Delays Your Pump
- A Packing Checklist Built for Pump Travel
- A Travel Gear Expert’s Take on Pump Rules
- How Stoiq Helps You Pack Smarter Around Your Pump Kit
- Sources
- FAQ
Quick Checkpoint Checklist for Pump Travel
Security lines move fast, and the officers scanning bags every few seconds don’t automatically know your cooler bag holds pumping equipment instead of snacks. Speak up before your bag hits the belt.
Tell the TSA officer you’re carrying breast milk, formula, cooling packs, and pump equipment before screening starts. That single sentence changes how your bag gets handled and usually prevents confusion once it reaches the X-ray operator.
Here’s what to have ready:
- Keep milk and cooling packs in a spot you can reach quickly, either at the top of your bag or in their own small cooler.
- Label every container with contents and date, especially if you’re carrying multiple bottles or bags.
- Pack pump parts, tubing, and flanges in a clear plastic bag or a see-through organizer so an officer can identify them without unpacking your entire bag.
- If your pump runs on a battery, know its watt-hour rating ahead of time, and keep any spare batteries in your carry-on, not checked luggage.
Pro Tip: Take a photo of your pump’s battery label before you leave home. If an officer asks about watt-hours and the sticker has rubbed off or faded, you’ll have proof on your phone instead of guessing.
None of this is complicated once you know the sequence: declare, separate, label, present. Officers see this setup dozens of times a day, and a traveler who’s clearly organized moves through faster than one who’s digging through a jumbled tote bag at the conveyor belt.
TSA Rules for Portable Pumps: What’s Allowed, What’s Exempt
TSA permits breast pumps in both carry-on and checked baggage, but the officer at the checkpoint makes the final call on how your specific bag gets screened. That’s true for nearly everything TSA allows. The rule sets the baseline, but the person standing at the X-ray machine decides how your particular situation gets handled that day.
The bigger relief for most parents traveling with a pump involves liquids. Breast milk, formula, and the cooling accessories that keep them cold are exempt from the standard 3-1-1 liquids rule, which normally caps carry-on liquids at 3.4 ounces per container. You can bring milk, formula, and juice in quantities larger than that, but they don’t get a free pass through screening unnoticed. You have to tell the officer what you’re carrying before the bag goes through the X-ray, and those items get pulled for separate inspection.
Breast milk, formula, and juice are treated differently than a bottle of shampoo or a travel-size lotion. TSA explicitly exempts them from the standard liquids cap, but that exemption comes with a condition: you must declare the items for individual screening rather than letting them ride through the X-ray with the rest of your carry-on.
One detail trips up a surprising number of travelers: you don’t need a child present to carry breast milk or pumping equipment. Business travelers who pump and ship milk home, or parents traveling without their baby for a work trip, get the same exemption as someone traveling with an infant in tow.
The liquids exemption in numbers: TSA’s own guidance confirms there’s no standard ounce cap on breast milk and formula, unlike nearly every other liquid category in a carry-on bag. The only requirement that replaces the volume limit is declaration and separate screening.
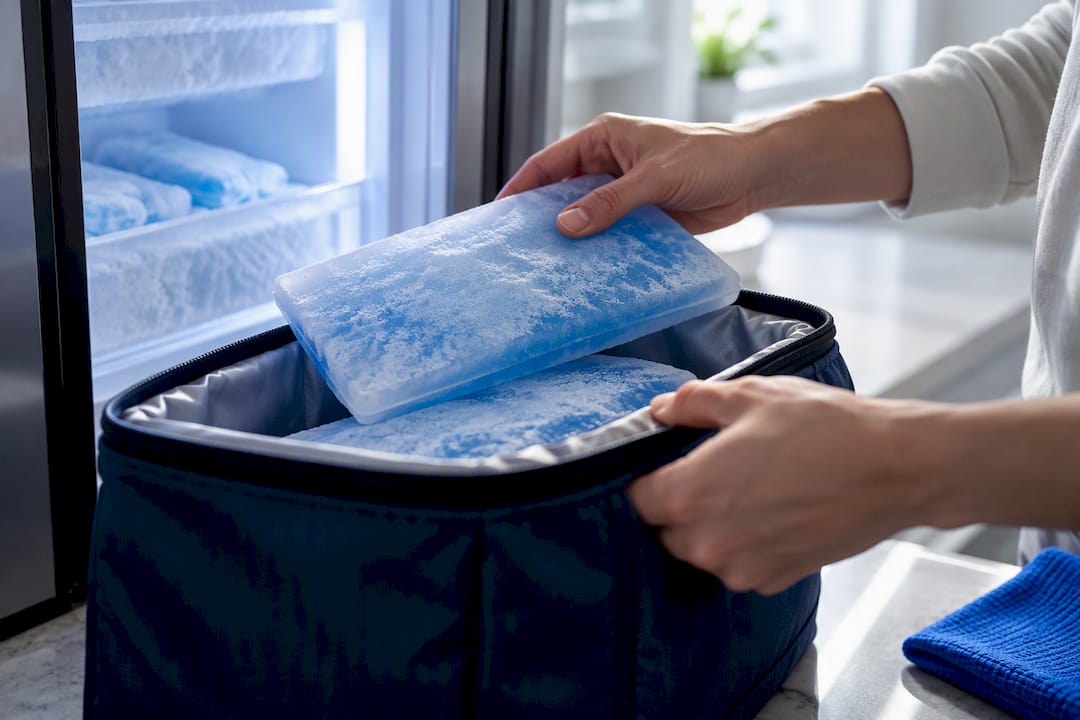
Cooling accessories get similar treatment. Ice packs, gel packs, and insulated coolers are all permitted, whether they’re frozen solid or already starting to soften. The catch is that partially frozen or slushy packs may trigger additional screening, because a pack that’s turned to liquid slush looks a lot like any other liquid on an X-ray image. Freezing your packs solid before you leave home, and timing your trip so they stay that way through security, cuts down on the odds of getting flagged for a secondary check.
TSA’s general list of permitted items also covers pumps more broadly, including devices like inflatable mattress pumps, noting that some items travel under “special instructions” rather than a flat yes or no. Breast pumps fall into the straightforward “allowed” category. It’s the accompanying milk, formula, and battery-powered components that carry extra procedural steps.
Lithium Battery Rules for Pumps and Chargers
Most portable pumps run on rechargeable lithium batteries, and that’s where a second set of federal rules kicks in, separate from the liquids exemption. The FAA regulates lithium battery watt-hours because these batteries can overheat or short circuit, and a fire in a pressurized cargo hold is a much harder problem to manage than one in a cabin.
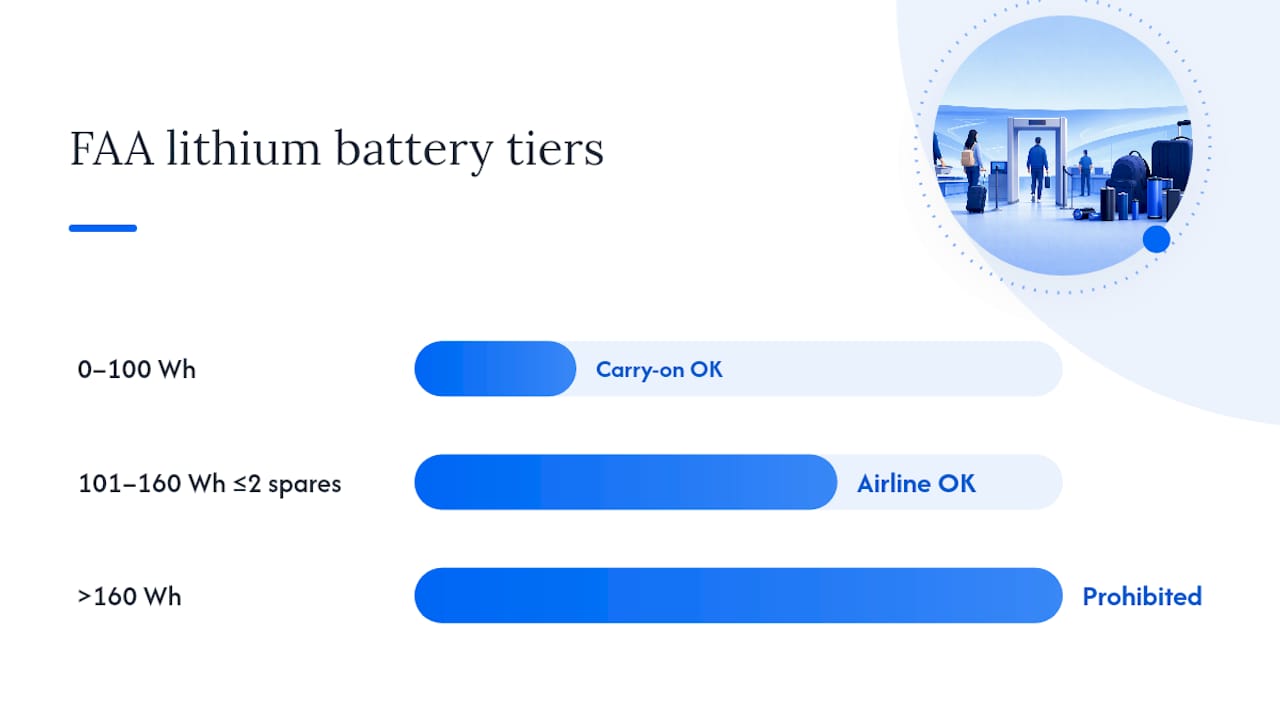
The FAA’s battery limits break down into three tiers:
- 0 to 100 watt-hours (Wh): Allowed in carry-on baggage without any special approval. Most portable breast pumps and standard power banks fall well within this range.
- 101 to 160 Wh: Allowed, but only with airline approval, and typically limited to two spare batteries per passenger.
- Over 160 Wh: Generally prohibited on passenger aircraft altogether.
Spare batteries and power banks always travel in the cabin, never in checked luggage. This isn’t a suggestion. It’s a firm rule because a damaged or short-circuited battery in checked baggage has no crew nearby to respond if something goes wrong mid-flight. If your pump has a removable battery, pack it in your carry-on with the terminals protected, ideally in its original packaging or a small pouch that keeps metal objects from touching the contacts.
By the numbers: the FAA’s tiered structure means the overwhelming majority of consumer electronics, including nearly every portable pump on the market, sit comfortably in the 0 to 100 Wh bracket that requires zero extra paperwork.
Most pump manufacturers print the watt-hour rating directly on the battery or in the device manual, but some only list milliamp-hours (mAh) and voltage (V) instead. If that’s what you’re working with, the FAA offers a simple conversion: Wh equals mAh multiplied by voltage, divided by 1,000. A small battery example such as a few thousand mAh at typical voltage equates to watt-hours well under the restriction limit. If the voltage isn’t listed anywhere on the device or in its documentation, contact the manufacturer before your trip rather than guessing, especially if you’re traveling with a high-capacity backup battery or power bank alongside your pump. Federal hazmat regulations under 49 CFR 175.10 give airlines the authority to apply stricter limits than the federal floor, so a quick call to your carrier before flying with anything in the 101 to 160 Wh range saves you from a surprise at the gate.
What Happens During Screening
Walking up to the checkpoint with a pump kit doesn’t have to feel like a gamble. The process follows a predictable sequence once you know what to expect.
- Declare before the belt. Tell the TSA officer you’re carrying breast milk, formula, cooling packs, and pump equipment before your bags go through the X-ray. This single step sets the tone for everything that follows.
- Separate the items for inspection. Pull your milk, formula, and cooling packs out and present them separately rather than burying them inside a packed bag. Officers need a clear look, and a bag stuffed with mixed items takes longer to sort through.
- Expect X-ray or a hand check. Breast milk typically goes through the X-ray without issue, but officers may offer, or in some cases require, a hand inspection or a swab test instead. This isn’t a sign anything’s wrong. It’s a standard alternative screening method for liquids that exceed the usual size limits.
- Watch for common delay triggers. Opaque containers that hide their contents, partially melted cooling packs, and pump parts mixed loosely with clothing or toiletries all slow things down. Clear containers and dedicated pouches speed things up.
There’s no fixed ounce limit on how much milk or formula you can carry. TSA’s guidance leaves quantity up to reasonable judgment tied to trip length and feeding needs, so a parent flying cross-country with a week’s supply isn’t held to the same standard as someone on a two-hour hop.
Pro Tip: Pack your cooling packs fully frozen and place them at the very top of your cooler bag. A solid block reads cleanly on X-ray, while a softening pack that’s gone slushy is far more likely to get pulled for a second look.
Airline Policies and Keeping Milk Safe In Transit
TSA sets the security rules, but your airline decides how it handles your pump once you’re past the checkpoint and into boarding. Many carriers classify breast pumps as medical devices, which usually means they don’t count against your standard carry-on allowance. That policy isn’t universal, though, so a quick check of your specific airline’s baggage page before departure saves you from an awkward conversation at the gate.
A few habits make in-flight pumping considerably less stressful:
- Request an aisle seat if you’ll need to pump mid-flight, since it gives you easier access to the aisle without disturbing a seatmate.
- Bring a hands-free pumping option if your device supports one, so you’re not stuck immobile for twenty minutes.
- Preassemble your pump parts before boarding when possible, since fumbling with tubing and flanges in a cramped seat wastes time you don’t have during a short flight.
- Plan your pumping window around boarding and connection times rather than leaving it to chance once you’re airborne.
Storage during travel matters just as much as the security process. The CDC’s guidance on handling and storing human milk lays out safe timeframes for milk kept at room temperature, refrigerated, and frozen, and those windows shrink fast once milk starts to thaw. A pack that’s fully frozen when you leave home buys you far more safe travel time than one that’s already partially thawed at check-in.
What the data shows: milk that’s frozen solid and stored in an insulated cooler stays safe considerably longer than milk cooled with a pack that’s already begun to soften, which is exactly why officers give extra scrutiny to slushy packs. The freezing status isn’t just a screening issue. It’s a food-safety one.
A couple of practical rules cut down on guesswork during a long travel day: never refreeze milk that’s fully thawed, label containers with the time you left the freezer so you can track how long they’ve been out, and avoid mixing frozen and thawed milk in the same container. If you’re facing a long layover or a delayed flight, a second set of frozen packs in checked luggage, if you’re checking a bag at all, gives you a backup swap partway through the trip.
Keep your pump kit separate from the rest of your packing system rather than burying it beneath folded clothes. If you’re using vacuum compression bags to free up space in your carry-on, compress your clothing separately and leave your cooler and pump pouch loose and accessible near the top. Compression frees up real estate for everything else, but a pump kit needs to come out fast at the checkpoint, so it shouldn’t be the thing you’re wrestling out from under a flattened stack of shirts.
If TSA Questions or Delays Your Pump
Most pump-related screenings go smoothly, but it helps to know your options if an officer flags something or a line supervisor gets involved. TSA officers have checkpoint-level discretion to request alternate screening methods, and that discretion exists specifically because liquids and medical equipment don’t always fit neatly into a standard X-ray review.
A few steps keep a stressful moment from turning into a missed flight:
- Stay calm and cooperative. Officers are following a defined process, and pushing back aggressively rarely speeds things up.
- If you’re asked for a hand inspection you’d rather avoid, you can request an alternative, such as a swab test, though the officer makes the final decision on which method applies.
- Ask for gloves to be changed if a hand inspection touches your milk containers directly, particularly if hygiene is a concern.
- If you need extra help navigating the process, ask for a Passenger Support Specialist, a TSA role specifically trained to assist travelers with disabilities, medical conditions, or complex screening needs.
- Keep a note or screenshot of TSA’s official breast pump and liquids guidance on your phone in case you need to reference the exact rule in the moment.
If something goes wrong during your trip, whether that’s an item confiscated in error or an officer applying a rule incorrectly, document what happened as soon as you can. Note the time, the checkpoint location, and the officer’s name or badge number if it’s visible. AskTSA, available through text and social media, is the fastest way to get a same-day answer to a screening question, and TSA’s formal complaint process exists for anything that needs follow-up after the fact.
A Packing Checklist Built for Pump Travel
A pump kit that’s organized before you leave the house saves you time at every stage of a trip, not just at the checkpoint — here’s a helpful Ultimate Travel Packing Checklist to make sure you don’t forget anything important. The layout that works best keeps four things clearly separated rather than jumbled into one bag.
- Pump and case: Keep the pump itself in its original case or a padded pouch, positioned where you can pull it out without unpacking everything around it.
- Clean spare parts: Store extra flanges, valves, and tubing in a dedicated clear pouch so they’re both sanitary and instantly visible to a screening officer.
- Insulated cooler: Pack frozen packs and milk containers together, but keep the packs themselves separated and labeled by freeze time.
- Battery pouch: Store any spare batteries or power banks in a small protective case with the terminals covered, sitting near the top of your carry-on where you can access it fast.
This is where a compression system earns its keep. A Stoiq Carry-On Solution compresses clothing down to a fraction of its normal bulk, which opens up room for a cooler bag and pump kit without forcing you into a second carry-on. The goal isn’t to compress the pump gear itself. It’s to shrink everything else so the pump kit gets the accessible space it needs.
Pro Tip: Pack your pump kit as if a stranger needs to find every piece of it in under thirty seconds. That’s roughly how long a TSA officer spends deciding whether your bag needs a closer look.
Travelers who’ve used compression bags for exactly this kind of trip talk about it in the Stoiq reviews, where the recurring theme is less about the pump itself and more about how much extra room shows up once clothing stops eating half the suitcase.
A Travel Gear Expert’s Take on Pump Rules
The rules around traveling with a pump are more forgiving than most first-time travelers expect, but the paperwork panic isn’t entirely unearned. TSA’s own guidance is scattered across several separate pages covering pumps, liquids, and batteries, and nobody hands you a single summary sheet at the airport.
Here’s what actually matters: declare early, keep things visible, and freeze your packs solid before you leave. Those three habits solve the overwhelming majority of checkpoint friction that shows up in traveler complaints, far more than any battery wattage technicality ever does. The pump itself is rarely the problem. It’s the loose parts and softening cooling packs buried at the bottom of a bag that slow people down.
My own packing rule, after watching how these screenings actually play out, is to treat the pump kit as its own separate unit from everything else in the bag, packed last and pulled out first.
— Hugh
How Stoiq Helps You Pack Smarter Around Your Pump Kit
Compression bags won’t get your pump through security faster, but they solve the packing problem that makes travel with pump gear feel cramped in the first place. Stoiq’s Carry-On Solution uses a built-in, USB-C rechargeable pump to compress clothing on the spot, no separate vacuum device required, which frees up real space in a carry-on for your cooler, pump kit, and battery pouch to sit accessible and untouched.
The Stoiq Compression Backpack works well for travelers who want their pump gear and everyday items in one bag rather than juggling a separate cooler tote, while the Toiletry Bag in Matt Black keeps pump accessories, wipes, and sanitizing supplies organized in their own compartments instead of loose in a side pocket. None of this replaces checking TSA and your airline’s specific policies before you fly, but once you’ve confirmed the rules, a compression system means you’re not sacrificing packing space just to keep your pump kit within reach. Browse the full lineup on the Carry-On Solution collection page and pack your next trip with room to spare.
Sources
The rules covered here come straight from federal guidance, not secondhand summaries. Worth bookmarking before your next flight:
- Breast Pump | Transportation Security Administration
- Portable electronic devices with batteries | FAA
For airport-specific questions or same-day help, AskTSA through text or social media connects you directly with TSA staff faster than a general customer service line.
FAQ
Can I Bring My Portable Pump on a Plane?
Yes, TSA allows breast pumps and most portable pumps in both carry-on and checked baggage. The battery inside the pump still has to meet standard lithium watt-hour limits, and any spare batteries must travel in your carry-on.
Can I Bring Breast Milk Without a Baby Present?
Yes, you don’t need a child traveling with you to carry breast milk or pumping equipment through security. The 3-1-1 liquids exemption applies regardless of whether your baby is on the trip.
What Are the Current TSA Battery Rules for 2026?
TSA and FAA rules remain tiered by watt-hour rating: 0 to 100 Wh is allowed in carry-on without approval, 101 to 160 Wh needs airline sign-off, and anything over 160 Wh is generally banned on passenger flights. Spare batteries and power banks must always stay in the cabin, never in checked luggage.
Can I Bring a 20,000 mAh Power Bank on a Plane?
Most power banks sit safely inside the 0 to 100 Wh carry-on allowance once converted using the standard formula. If your specific power bank runs at a higher voltage and pushes past 100 Wh, check the FAA’s watt-hour tiers and confirm with your airline before packing it.
Why Do Some Cooling Packs Get Extra Screening?
Partially frozen or slushy cooling packs can trigger additional screening because they read similarly to other liquids on an X-ray. Packing your cooling packs fully frozen before leaving home reduces the odds of a secondary check.
Do I Need to Declare My Pump Equipment at Security?
Yes, declaring your breast milk, formula, cooling packs, and pump equipment to the TSA officer before screening starts is the fastest way through the checkpoint. Keeping those items separated and visible in your bag speeds up the inspection process considerably.
