



Pack 2 to 3x More Using Vacuum Bags With Built In Pumps for Travelers
Yes, vacuum bags let you pack far more into the same suitcase or closet bin, but only when you follow a few rules. Use them on clean, fully dry, non-delicate items, respect the printed fill line, and pick a compression method that matches how you travel. Vacuum bags shrink volume, not weight, so a suitcase full of compressed sweaters can still push you over an airline limit.
TL;DR:
- Use only fully dry, clean, and non-delicate items in vacuum bags to prevent mold, damage, and seal failures, especially when overfilled past the print line.
- Choose a compatible air removal method, with built-in rechargeable pumps offering the most reliable convenience for repeat use during travel.
- Keep bulky, irregular, or embellishment-heavy items out of vacuum bags to avoid punctures, cracks, or loss of structure, especially with leather, fur, and detailed garments.
- Pack multiple smaller vacuum bags rather than one large one for better suitcase organization, and remember that compression reduces volume, not weight.
- Regularly inspect and clean vacuum bags before reuse, and avoid sealing damp clothing, food, or heavily structured garments to prevent mold, spoilage, or damage.
Table of Contents
- How Do You Use Vacuum Bags Correctly Before Packing?
- Step-by-Step: How to Pack, Seal, and Remove Air Without Leaks
- Which Air-Removal Method Should You Use?
- Where Do Compressed Bags Actually Go in Your Suitcase?
- What Should You Never Put in a Vacuum Bag?
- How Do You Care for and Reuse Vacuum Bags?
- Why Do Built-In Pumps Matter More Than Most Guides Admit?
- The Real Trade-Off Nobody Puts on the Packing List
- Pack Smarter With a Pump That Travels With You
- Sources
- FAQ
How Do You Use Vacuum Bags Correctly Before Packing?
Getting good results starts before you ever touch a valve. Most vacuum bag failures trace back to skipping a prep step, not a defective bag.
Run everything through the laundry and let it dry completely first. Any lingering dampness gets trapped once you pull the air out, and that moisture has nowhere to go. Utah State University Extension warns that sealing in trapped moisture creates conditions for mold and mildew, and once that smell sets into fabric, it’s brutal to remove.
Before you seal anything, work through this list:
- Launder and fully dry every garment. Skip anything even slightly damp, sweaty, or freshly worn.
- Match the bag size to your load, then respect the fill line printed on the bag. Overfilling is one of the most common reasons seals fail.
- Choose your compression method ahead of time. A closet-sized bin doesn’t need the same tool as a carry-on packed the morning of a flight.
- Set aside documents, medications, and anything you’ll need at security or mid-flight. Keep those items outside the compressed bags entirely.
That last point matters more than most travelers realize. The TSA permits vacuum-sealed clothing in both carry-on and checked bags, but officers can open a sealed bag for inspection at their discretion. If your passport or prescription is buried inside a compressed block of clothes, you’re re-sealing a bag at the checkpoint while everyone behind you waits.
Pro Tip: Pack a spare gallon-size zip bag in your carry-on. If TSA needs to open a vacuum bag and the seal doesn’t hold on the second try, you’ll have a backup to keep those items contained until you can re-vacuum at your destination.
Step-by-Step: How to Pack, Seal, and Remove Air Without Leaks
The mechanics of using a vacuum bag are simple once you’ve done it a couple of times, but the order of operations trips people up. Follow these steps in sequence and you’ll avoid the two most common mistakes: air pockets that won’t release and zippers that won’t seal.
- Lay the bag flat with the valve facing up. Working on a bed or floor gives you more control than trying to load a bag standing on end.
- Fold items and place them inside, staying below the printed fill line. U-Haul’s packing guidance recommends loading only clean, dry items and never packing past that marked line, since overstuffed bags put stress on the seal exactly where you need it to hold.
- Keep clothing away from the zipper track and the valve. A stray sleeve caught in the zipper teeth is the single most common reason a “sealed” bag isn’t actually sealed.
- Close the zipper or clamp completely, then run the slider back and forth once more. Check the full length of the seam with your fingers. Any gap, even a small one, will let air back in overnight.
- Attach your vacuum hose, hand pump, or built-in pump to the valve. Run it until the bag stops shrinking and the items are firm to the touch, not until a timer runs out.
- Close the valve cap immediately after removing the vacuum source. Air rushes back in fast, so don’t set the hose down before capping the valve.
If you’re using a roll bag instead of a valve bag, the technique changes slightly. Lay items in loosely, seal the top zipper, then roll from the closed end toward the open valve or one way seal, pressing steadily as you go. The motion pushes air ahead of your hands and out through the opening, rather than trapping it in pockets along the way. Roll bags never get as flat as a vacuum-pumped bag, since there’s no active suction pulling out residual air, but they work fine for softer items like t shirts and underwear where a little extra bulk doesn’t matter.
One detail worth flagging separately: U-Haul’s Spacemaker product guidance recommends isolating rigid or irregular objects, shoes, belt buckles, hardware, rather than mixing them in with soft clothing. A buckle pressed against the film under vacuum pressure can puncture the plastic, and once that happens the bag is done.
Which Air-Removal Method Should You Use?
Not every vacuum source works with every bag, and the mismatch is one of the most common frustrations first-time users run into.
A standard household vacuum cleaner hose is usually the most reliable option at home. Most vacuum bags are sized to fit a canister or upright hose attachment directly onto the valve. Handheld dustbuster-style vacuums are a different story. Their nozzles are typically the wrong diameter or shape, and they often don’t generate enough sustained suction to fully collapse a large bag.
For travel, your options narrow:
- Hand pumps are compact and require no batteries, but expect several minutes of pumping to fully compress a jumbo bag.
- USB mini pumps are faster than manual pumping and pack small, though they need to be charged ahead of your trip.
- Built-in rechargeable pumps attached directly to the bag are the most convenient for travelers, since there’s no separate device to pack, charge separately, or lose in an airport lounge.
- Manual roll compression needs no device at all, but it leaves noticeably more residual air than any vacuum-assisted method.
Travel + Leisure’s testing of travel vacuum bags found meaningful differences between products in ease of use, durability, and how much air crept back in overnight. That overnight test matters more than a lot of travelers assume. Compress a bag before bed, then check it in the morning. If it’s noticeably puffier than when you sealed it, the seal or valve has a slow leak, and you’ll want to know that before you’re relying on it at 30,000 feet.
Where Do Compressed Bags Actually Go in Your Suitcase?
Resist the urge to compress everything into one giant slab. Several smaller vacuum bags pack more efficiently than a single oversized one, since flat rectangular blocks stack and shift around other items far better than one rigid brick that fights the shape of your suitcase.
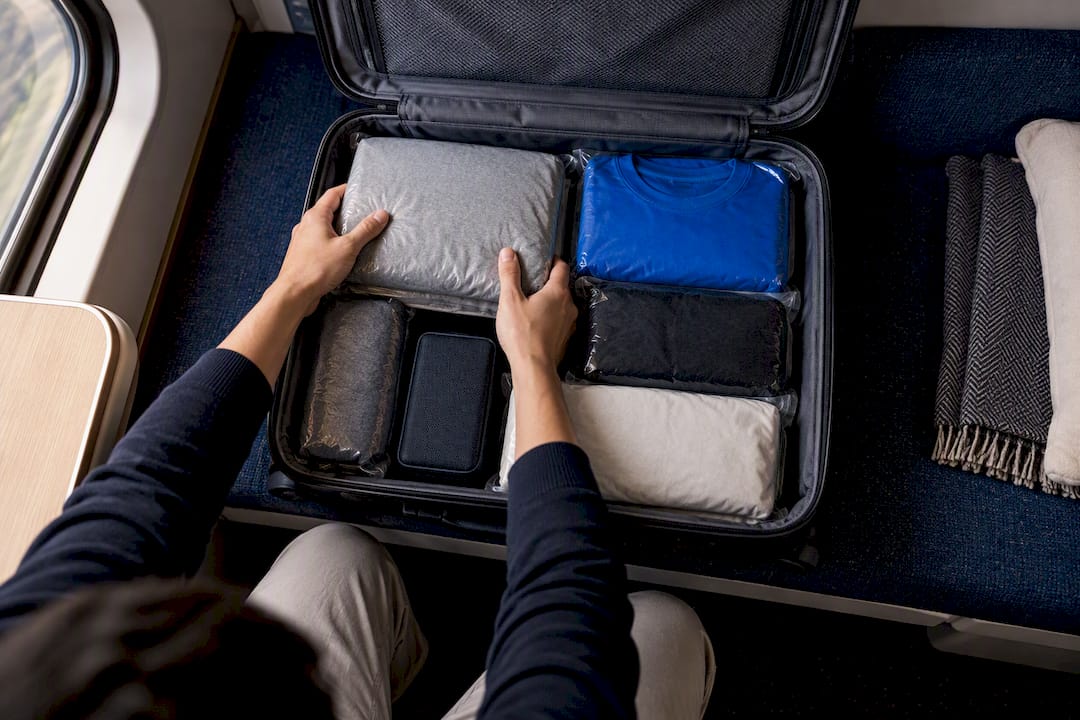
Once your bags are compressed, layer them flat across the bottom of the suitcase and build around them with shoes, toiletry cases, and anything else that isn’t going in a vacuum bag. Reserve the top-access pockets and outer compartments for whatever you’ll need first: your first-day outfit, a phone charger, or the documents you deliberately kept out of the sealed bags.
Here’s the part that catches people off guard every time: compressing your clothes reduces volume, not weight. A carry-on that’s technically half empty by bulk can still weigh the same as it did packed loosely, because vacuum sealing removes air, not fabric. If you’re flying with a strict weight allowance, weigh your bag after compressing, not before, so you’re not surprised at check-in.
- Use multiple small or medium bags instead of one large one for better flexibility.
- Pack compressed bags flat, then build the rest of your suitcase around them.
- Keep your first outfit and travel documents outside the compressed bags in a top pocket.
- Weigh your luggage after compression, since volume savings don’t translate to weight savings.
- Let compressed garments sit unfolded for an hour or two after unpacking to help them regain their original loft.
What Should You Never Put in a Vacuum Bag?
Some items simply don’t belong in a vacuum bag, and packing them anyway risks real damage rather than just a wrinkle or two.
Skip anything damp, sweaty, or unlaundered. Trapped moisture inside a sealed environment is exactly the setup mold needs, and Utah State University Extension’s food storage packaging guidance applies the same underlying principle to fabric that it does to food: sealing moisture inside without a way for it to escape creates a breeding ground you can’t see until the smell shows up.
Leather, fur, structured blazers, and heavily embellished garments with beads, sequins, or rigid trim also don’t compress well. The pressure can crack leather, crush structured shapes permanently, or pop off decorative elements that won’t reattach. Some down items lose loft after repeated heavy compression, so treat down jackets and pillows as occasional-use candidates for vacuum bags, not everyday ones.
Food deserves its own warning entirely. Vacuum sealing moist or perishable food without proper heat processing is not a safe preservation method on its own, and USU Extension specifically flags increased botulism risk when moist foods are vacuum packed without food-grade, heat-processed packaging. That guidance applies to food storage generally, and travelers packing snacks in the same bag as clothes should treat it as a hard line, not a suggestion.
- Damp, sweaty, or unwashed clothing.
- Leather, fur, and structured or embellished garments.
- Moist or perishable food without proper heat-processed, food-grade packaging.
- Down items you plan to compress repeatedly over the long term.
How Do You Care for and Reuse Vacuum Bags?
A well-made vacuum bag isn’t a single-use item, but it does need basic maintenance if you want it to last through more than one trip.
Empty each bag, wipe it out, and let it air dry completely before folding it away. Trapping any residue or moisture inside a stored bag defeats the purpose the next time you use it. Try not to fold directly across the zipper track repeatedly, since that’s the part most likely to develop micro-tears over dozens of uses.
Before every reuse, run your fingers along the full seal and check the valve for cracks or a loose cap. U-Haul recommends periodically re-applying vacuum to bags in long-term storage, since even a well-sealed bag will draw in a small amount of air over weeks or months. A small tear near an edge can sometimes be patched with clear packing tape on both sides of the film, but a compromised zipper track or a valve that won’t hold suction means it’s time to retire the bag.
- Empty, clean, and fully dry bags before folding them for storage.
- Avoid repeated hard folds across the zipper track.
- Check seals and valves before every reuse; patch small tears, but retire bags with damaged zippers.
- Re-vacuum long-term storage bags periodically and watch for slow overnight air return.
Pro Tip: Keep one bag per size labeled by trip type, weekend carry-on, seasonal storage, ski trip, instead of grabbing whatever’s closest. Bags used exclusively for storage get far less wear than ones you’re compressing and decompressing every week.
Why Do Built-In Pumps Matter More Than Most Guides Admit?
Most vacuum bag advice assumes you’re standing near a household vacuum cleaner, and that assumption falls apart the moment you’re repacking in a hotel room or an airport gate area. This is where a built-in rechargeable pump changes the actual experience of using a vacuum bag, not just the marketing pitch around it.
An integrated USB-C rechargeable pump means there’s no separate device to pack, no hunting for a compatible hose, and no dependency on finding an outlet mid-trip since the pump charges ahead of time and holds a charge across multiple uses. That matters most in the exact moments travel gets messy: repacking at a connecting airport, compressing souvenirs picked up mid-trip, or squeezing a week’s worth of laundry back into a carry-on before a red-eye flight.
Stoiq reports that its integrated pump system helps travelers pack two to three times more into a carry-on than they could with folding alone, a claim drawn from the brand’s own testing and shared by more than 20,000 travelers who’ve used the product. Independent testing from outlets like Travel + Leisure has found that pump convenience and overnight air retention vary widely across the category, which is exactly where a built-in system designed for repeated on-the-go use has room to stand out.
A pump that’s already attached to the bag and already charged solves the one problem every other method creates: needing a second device, in a place where you don’t have one.
- No external hose, pump, or vacuum cleaner needed once you’re away from home.
- Recharges via USB-C, so it doesn’t need replacement batteries mid-trip.
- Designed for repeated repacking across multi-leg trips, not just a single seal-and-store use.
The Real Trade-Off Nobody Puts on the Packing List
Most packing advice treats vacuum bags as a volume trick and stops there. That undersells the actual decision travelers are making, which is really about time and effort, not just cubic inches. A hand pump saves money but costs you five minutes of pumping in a hotel bathroom at 6 a.m. A household vacuum cleaner works great until you’re three cities into a trip with no vacuum cleaner in sight.
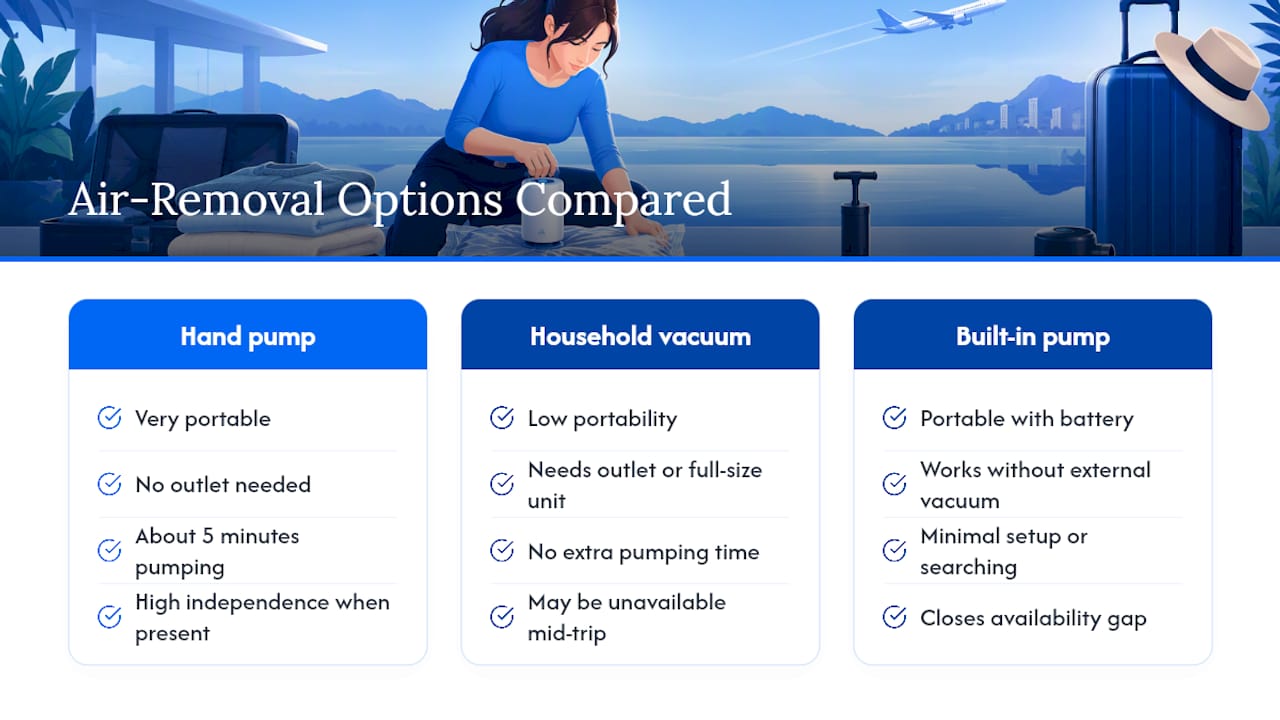
The conventional wisdom, “just get any vacuum bag and squeeze the air out,” misses that the compression method matters as much as the bag itself. Bags are only half the equation. If your air-removal source is unreliable or missing entirely once you’re traveling, the bag becomes dead weight in your suitcase rather than a space-saving tool.
Prioritize compatibility with how you’ll actually use the bag before you buy it. A device you’d have to seek out or charge from an outlet you might not have access to isn’t a convenience, it’s a contingency you’re hoping doesn’t fail. That’s the gap a built-in, rechargeable pump closes, and it’s worth weighing before the volume-savings pitch, not after.
— Hugh
Pack Smarter With a Pump That Travels With You
Stoiq built its Carry-On Solution around the one problem every vacuum bag eventually runs into on the road: no reliable way to remove air once you’re away from home. Its USB-C rechargeable pump is attached directly to the bag, so there’s no hose to hunt for, no vacuum cleaner to borrow from housekeeping, and no separate gadget to lose in an airport terminal.
The bag itself is built to the same clean-and-dry, fill-line rules covered above, and it’s sized to fit airline carry-on standards while giving you room to compress two to three times more into the same space than folding alone allows. If you want to see how it holds up in real use, the Stoiq reviews page collects feedback from over 20,000 travelers who’ve packed with it across everything from weekend trips to multi-leg international itineraries. Prefer a hands-free option? The Compression Backpack pairs the same pump system with a wearable design. Either way, the next step is simple: check the sizing on the product page, add shipping protection at checkout if you want the extra coverage, and pack your next trip without needing a vacuum cleaner within reach.
Sources
- How to Use Vacuum-Seal Bags for Storing Clothes | U-Haul
- Vacuum-sealed bags | Transportation Security Administration
- Food storage packaging | Utah State University Extension
- The 4 best vacuum bags for travel, tested and reviewed
FAQ
What Are the Downsides of Using Vacuum Bags?
Vacuum bags reduce volume but not weight, so a suitcase can look half-empty and still hit an airline’s weight limit. They can also crush structured or embellished items, and a torn seal or worn zipper will let air back in, undoing the compression entirely.
Are You Supposed to Reuse Vacuum Bags?
Yes, most vacuum bags are designed for repeated use as long as the seal and valve stay intact. Clean and fully dry each bag before storing it, check the zipper track and valve before every reuse, and retire any bag with a damaged seal or a valve that won’t hold suction.
Can You Use Regular Ziploc Bags as Vacuum Bags?
Not reliably. Standard Ziploc bags lack the reinforced seals, thicker film, and one-way valves that purpose-built vacuum bags use, so they generally won’t hold compression the way a real vacuum bag does.
What Should You Not Put in a Vacuum Bag?
Skip damp, sweaty, or unwashed clothing, since trapped moisture invites mold and odor. Leather, fur, structured or embellished garments, and moist or perishable food without proper heat-processed packaging all belong on the same “avoid” list, according to food-safety guidance from Utah State University Extension.
Does Stoiq’s Built-In Pump Work Without an Outlet?
Yes, the pump charges via USB-C ahead of time and holds enough charge for repeated use, so travelers can compress and repack bags without needing to plug in during the trip. Current pricing and product details are available on the Stoiq Carry-On Solution collection page.
